Laboratories around the world are in the process of developing new methods to welcome new users in the aftermath of the COVID-19 lockdown. Members of Euro-BioImaging, a pan-European infrastructure that provides life scientists with open access to a broad range of biological and biomedical imaging technologies, are sharing their experiences. Eija Jokitalo of Euro-BioImaging’s Finnish Advanced Light Microscopy (FiALM) Node shares her experience providing remote access to the EM facility in Helsinki – where remote access and receiving samples from abroad is the normal mode of operation.
What is typical project at your facility like? A typical 3D- EM and CLEM project unrolls in three steps, and usually takes about 4-6 weeks. We cannot require a user to stay in Helsinki for the full length of the project – even under normal circumstances - so we have developed a workflow for doing projects remotely. Before starting the project, we establish a protocol with the user and identify the steps of the project that require interaction. Each time user interaction is necessary, a zoom call or a skype call - according to user preference – is scheduled.
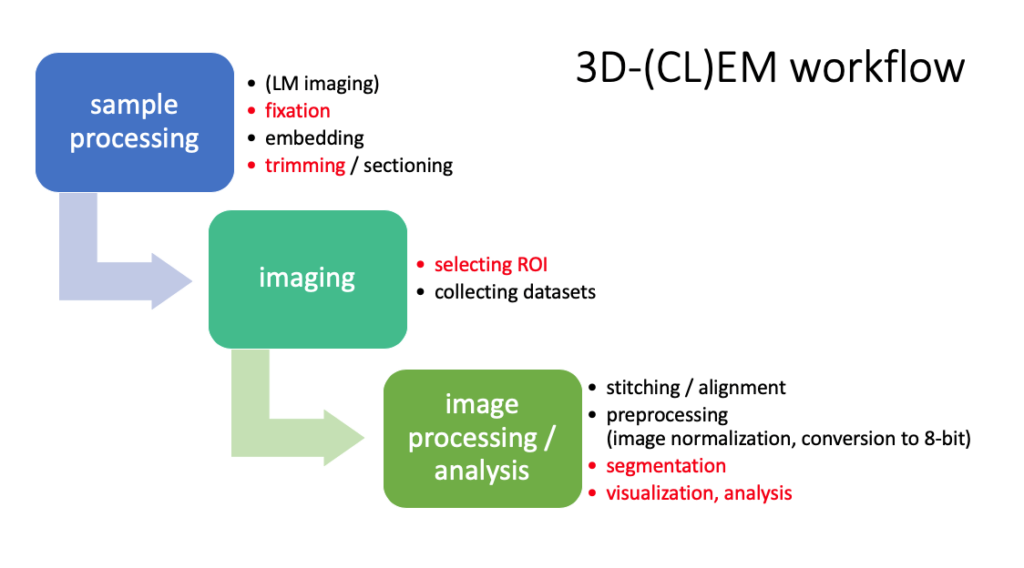
Figure 1: These are the steps in 3D-(CL)EM workflow at the Finnish Advanced Light Microscopy Node. Red text indicates steps that require user interaction.
What is important to keep in mind for remote projects?
First, we need people in the core facility who can dedicate time to the project. Secondly, good communication is the key to successful collaborative project. The user is the expert on the biology, and we are the experts in imaging. It is important for us to understand exactly what the user wants to analyse so that we can collect the data from the correct place with correct imaging parameters. The user also has to understand what we, the imaging center, are talking about.
Can you take us through a virtual project, step-by-step?
Step 1: Sample processing
We are used to receiving samples from abroad. Users fix the sample according to our instructions, and send them using courier service. Samples are shipped in formaldehyde solution, and we ask users to fill up the containers to minimize the sloshing, which might harm the samples. When the sample arrives, we do the embedding. We follow the instructions the user sends for trimming and sectioning. It is important for everything to be documented very clearly by the user, and we follow the user’s instructions very carefully. We have cameras on every instrument used during trimming and sectioning, so we can share every step with the user, and get their feedback remotely.
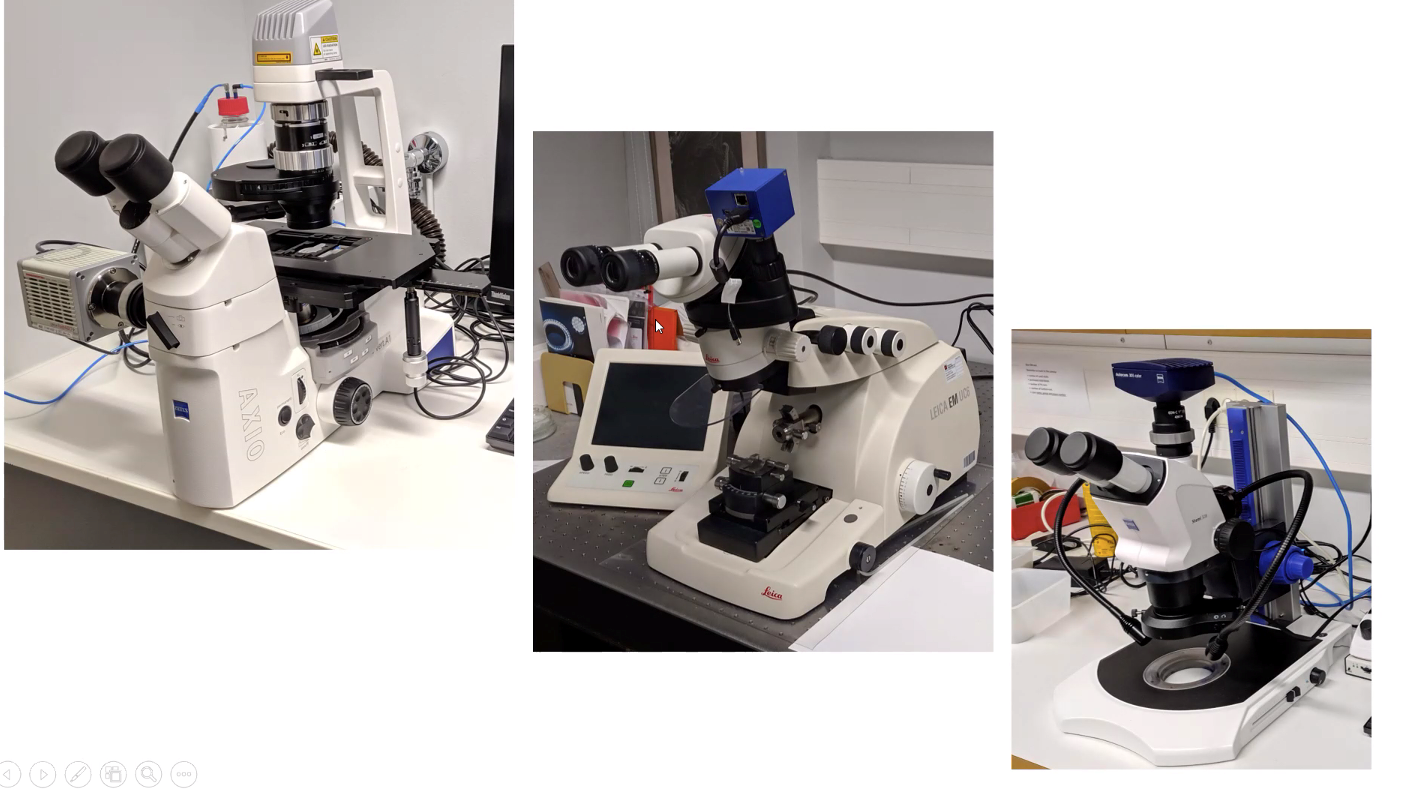
Figure 2: These instruments are used during the trimming to find the correct region of interest (ROI), and each of them is equipped with a camera.
Step 2: Imaging
During the imaging step, the user interaction is crucial at the very beginning when together with the user, we select the ROI and define imaging parameters. We can share microscope screens with the user, so they can follow the data collection in real time as long as they want.
Step 3: Image processing/analysis
Image processing and data analysis is done with computers. As we use free software, users do not need to connect to our computers but can use their own. We will usually do the stitching, alignment and preprocessing steps as these are more imaging specific. Segmentation is the most time consuming phase and here we try to share the workload with the user to optimize the use of time. We use zoom or skype calls to give instructs to the users, and to monitor the progress of segmentation.
Global BioImaging Advance the Conversation on Sustainable Biomedical Imaging Facilities
How can biomedical imaging facilities remain scientifically excellent while becoming more financially, environmentally, and operationally sustainable? These questions were at the heart of…
Moara Lemos: New insights from Global BioImaging’s Job Shadowing programme
Moara Lemos is a Brazilian researcher and imaging scientist. Her award winning research pushes the boundaries of structural biology, using advanced cryo-electron microscopy…
A Multiplexed Vision: Highlights from the Special Edition Virtual Pub on Spatial Transcriptomics
On June 12th, Euro-BioImaging hosted its latest Special Edition Virtual Pub, bringing together over 200 researchers and technology developers working at the cutting…